

 Back in April last year, we wrote an article about teaching children to grow food like vegetables and herbs at home — and its many benefits. It turned out to be enormously popular, so today we follow up with a guide to growing microgreens, for children. This activity is great fun, very educational and the result is extremely nutritious food!
What Are Microgreens?
Also known as micro leaves, microgreens are an easy-to-grow crop that can be grown by children and parents any time of year. What’s more, they can be grown indoors, without needing much room, and all at negligible cost. Take a look at the photos and you’ll soon get the idea of what type of crop they are; they’re basically the very young sprouting leaves and shoots of things like root vegetables, young herbs and leafy greens. We’ll go into more detail about those shortly.
Why Children Should Grow Microgreens
 Microgreens are great fun and extremely easy for children to grow. Once ready, they can be used rather like salads and garnishes. They are very tasty and are extremely nutritious.
Because they’re so compact, they can also be grown in virtually any household. They can be grown indoors too, for example on a windowsill, so families without gardens can also enjoy growing them. What’s more, getting children to grow microgreens may save money for the household.
Growing microgreens will really educate children about nature and the importance of caring for a living thing. It’ll help them learn new skills, teach them to be responsible and also help them learn more about where food comes from.
Growing their own food may also make children more likely to try different foods, particularly natural ones like these that are so good for them. All things considered, this fun, natural, educational activity is a total win-win!
What They Are Grown In
 Microgreens are traditionally grown in shallow seed trays, which are inexpensive to buy. However, at home, they can just as easily be grown in flower pots, used yoghurt pots, empty egg cartons, the trays from ready-meals or even cut-down cardboard cores from kitchen rolls. So long as water is allowed to drain from them and they can support at least a shallow depth of compost, these can all be suitable. Plastic cartons will need a few holes punched in the bottom to allow for drainage, so parents might need to organise that in order to avoid their children hurting themselves. Other than that, it’s plain sailing for supervised children to do themselves.
What Else is Needed?
Microgreens are usually grown from seeds and, for those, you have a couple of options. Both are very inexpensive. You can use either:
- seeds purchased in packets (e.g. from a shop or online),
- or seeds that you have saved from fully-grown herbs, fruit or vegetables. Learn more about harvesting your own seeds, potentially for free, from existing fruit, vegetables and herbs in our previous post here.
 Suitable seeds include: rocket, a type of strongly-flavoured lettuce; beetroot, with their lovely red stems and mild, earthy taste; spinach, which also has a mild flavour and is full of goodness; red cabbage, which is also rich in a variety of vitamins and minerals; fennel, which will have a distinctive aniseed flavour; broccoli, which will grow into sprouts that have a slightly spicy taste; radish seeds, which also grow into leaves that taste a little fiery; and also mustard seeds (for children who are OK with even more hot, spicy flavours).
The only other things that are needed for children to grow microgreens are water, drip trays and some compost.
- For the compost, ‘Multi-Purpose Compost’ or ‘Seed & Cuttings Compost’ are both perfect. Peat-free versions of those are even better, as they’re kinder to the environment.
- You’ll need some seed ‘drip trays’ to place under your trays or pots of microgreens. As the name suggests, these are simply trays to catch the draining water and to protect your windowsill etc. They’re inexpensive to buy but, if you’re on a budget, a saucer or suitably shaped plastic carton of some sort will be fine, so long as it’s watertight underneath and is shallow enough. This is also a great way to recycle plastic and show your child how easy it is to do so.
Setting Up & Sewing the Seeds
Setting up is easy:
 First, your child should fill the seed trays, flower pots or equivalent, almost to the top, with some compost.
- Then firm it down a little so it is flat and even.
- If they want to manually space out the seeds individually, then they can use a fingertip to indent where the seeds will go, then pop a seed into each indent.
- Otherwise, the fastest and easiest approach is to lightly sprinkle the seeds onto the compost. Be sure to do it lightly (tip: sprinkle from a little bit of a height to make this easier). Your child should avoid allowing the seeds to clump or be spread too densely, otherwise problems can occur once they start to grow.
- Optionally, the seeds can then be covered with a light sprinkling of more compost, just to keep them in place while still allowing some light to get to them.
- Water lightly (outside may be best to avoid any mess indoors). Be gentle when watering so the seeds do not simply wash away.
- Place the pots or trays of seeds back on the windowsill or similar. Wherever they are placed, it needs to be in full daylight during the day and also ventilated.
- Optionally, they can be temporarily covered with a piece of kitchen towel or cling film, but this is only while the seeds germinate.
- Your child should check daily to ensure that the compost stays moist. If needed, water gently from above or, if seed trays are shallow, put some water into the drip trays so the compost draws it up.
- As as shoots begin to appear (usually after just a few days), remove any covering if used and continue to ensure that the compost is always kept moist, but not over-watered.
 First, your child should fill the seed trays, flower pots or equivalent, almost to the top, with some compost.
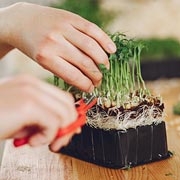 As as shoots begin to appear (usually after just a few days), remove any covering if used and continue to ensure that the compost is always kept moist, but not over-watered.
Harvesting your Microgreens
In just one to two weeks, you should have a nice ‘blanket’ of shoots and baby leaves growing beautifully. The idea with microgreens is to harvest them while they have baby leaves, before mature leaves start to form. So, they should be harvested while still very young. Snipping them at their bases instead of pulling them up may allow them to regrow, so they can be harvested more than once.
Microgreen Meals
 Once harvested, they should be rinsed to get rid of any stray compost. They are delicious to eat and, depending on the seeds grown, have a huge variety of tastes and colours. Children and parents alike can benefit from the nutritious and tasty shoots as part of a variety of meal types. Full of vitamins and minerals, they can be used in salads, as pizza toppings, garnishes, toppings for risottos, soups and pastas, as fillings in sandwiches, sprinkled on top of baked potatoes or into burgers and much more. They’re very adaptable and, with their distinctive tastes and textures, will make any meal really special.
Childcare Excellence in Streatham, SW16
![]() Children will love growing these little edible plants and harvesting them for food. They will learn so much along the way, building to a great sense of achievement in what is a great home learning activity. Learning at home is just as essential as all the learning that takes place at nurseries like Little Cedars Nursery in Streatham. Children will learn best when it’s a true partnership between nurseries/pre-schools and parents, so we encourage regular feedback and cooperation.
Children will love growing these little edible plants and harvesting them for food. They will learn so much along the way, building to a great sense of achievement in what is a great home learning activity. Learning at home is just as essential as all the learning that takes place at nurseries like Little Cedars Nursery in Streatham. Children will learn best when it’s a true partnership between nurseries/pre-schools and parents, so we encourage regular feedback and cooperation.
If you are looking for outstanding nurseries in Streatham for your baby or under-five child, please get in touch with Little Cedars Nursery. Our nursery is also near Streatham Common, Streatham Hill, Streatham Park, Furzedown, Tooting, Tooting Bec, Tooting Broadway, Tooting Common, Balham, Norbury and Colliers Wood, so get in touch if you’d like to discuss or register a place for your child. We’d love to show you around …

 It may surprise some to learn that you can buy some vegetables and herbs just once and never have to buy them again. The secret is knowing which, and how to re-grow them. It turns out that it’s pretty easy, so we encourage parents to help youngsters get started. Once they see growing shoots or roots and, later, vegetables or herbs that the family can actually eat, they’ll be so pleased that they made this little miracle possible. What’s more, it will have taught them something about where food comes from, how to grow it sustainably and how to look after the living plants. If you’re really lucky, it may even encourage them to take things a step further and get involved in food preparation and cooking later on. It’s amazing, actually, where such a simple, fun, activity can lead!
 It’s possible, and indeed fairly easy, to grow your own produce even without a garden. So long as you look after your plants and give them water, soil and light as a bare minimum, they will grow. If you don’t have a garden, perhaps you have a small courtyard or patio where you can grow in containers. If you don’t have any outside areas at all, you can grow in flower pots and other containers on window sills, balconies, under skylights and so on. This makes growing produce possible almost anywhere, including in urban London in high-rise flats. After all, it’s in a plant’s nature to want to grow.
 Children could start with green onions or spring onions. These are particularly easy to ‘re-grow’. Later, perhaps, the children can apply the same approach to celery, lemon grass, Cos lettuce and Pak Choy (a type of Chinese cabbage). Simply save an inch or so thick section of your shop-bought root vegetables (perhaps the last you will ever need to buy), which includes the bottom part at the root end. All your children need to do is to place that section, root end downwards, in a glass of water. Leave them in the water and, after somewhere between 1 and 3 weeks, roots will start growing. Children will love monitoring this process each day and they will enjoy looking after and caring for a living thing. Once the roots are substantial enough, children can take them out of the glass and re-pot them in soil, ideally with a bit of compost if you have any. This can be in containers, appropriately sized flower pots or in the garden if you have access to one. Before long, your plants will give your children more, free herbs and vegetables that you can all enjoy.
 Garlic cloves are also incredibly easy to regrow in a similar way. Perhaps at some point you’ve unintentionally allowed your shop-bought garlic cloves to ‘sprout’. Well, that’s how to start off. Rather than discarding them, your children can put them in water and allow roots to grow. Then, they should plant them out in soil and eventually they’ll end up with more, free, garlic cloves. What’s more, they will tend to taste more mild and delicate than shop-bought garlic — children will probably appreciate that. It’s the same with ginger roots, but allow months rather than weeks in their case.
 Herbs like Coriander, Rosemary and Basil can also be re-grown. Children can simply take scraps or clippings (4 inches long in the case of basil, 2-3 inches in the case of Rosemary) and place them in glasses of water in a well-lit spot on the windowsill. Once they have sprouted roots of about 2 or so inches long, these young ‘plants’ can be transplanted into soil or compost in pots. Your child will then be able to watch the plants flourish and grow into new herbs that can be harvested for food later on. The children will also soon discover that each of these herbs has a wonderful and distinctive taste and smell.
 Later, when growing sprouts reach the surface, the child should keep those covered with soil (this is called ‘hilling’). Get your child to keep the soil moist but not over-saturated over the subsequent weeks. If planted in the spring, your children should be able to harvest potatoes in the summer.
 Then, of course, your children can also experiment with nursery bought, or mail order seeds. Although not free, they’re reasonably inexpensive and also fun for children to grow if you follow the instructions and timing suggested on the seed packets. Beans of various kinds and sugar snaps are particularly easy to grow and usually result in an excellent crop. They will benefit from being in a garden or outdoor patio area, ideally, due to the space they require. They will need more vertical space than horizontal space, however, so even balcony planting may be possible if you have suitable grow bags.
